 Pin it
 I discovered these protein cheesecake cups on a random Tuesday afternoon when I was tired of the same protein bar routine and wanted something that actually felt like dessert. Standing in my kitchen with cream cheese softening on the counter, I realized I could make something that tasted indulgent but worked with my post-workout goals. The first batch taught me that you don't need an oven or complicated techniques to feel proud of what you've made. What started as an experiment became the thing I reach for when I want something sweet that doesn't require a guilty conscience.
I remember bringing a batch to a friend's house for dessert, and watching her take one bite while still in her workout clothes was honestly the best compliment I've ever gotten. She asked if they were homemade because they looked too polished to be anything else, and that moment made me realize that healthy food doesn't have to look or taste apologetic. Now whenever someone asks for a dessert recipe that's actually good for you, these are the ones I hand over.
Ingredients
- Oat flour: This is the quiet hero of the base—it stays tender when pressed and holds everything together without the density of regular flour, though almond flour works beautifully if you're skipping gluten.
- Almond or peanut butter: The binder that makes the crust actually stick; use the creamy kind for an easier time, and don't skip the pinch of salt because it brightens the whole flavor.
- Honey or maple syrup: Just enough sweetness to make the base taste intentional, not like eating fitness food.
- Cream cheese: Room temperature is non-negotiable here—cold cream cheese will give you a lumpy filling, and nobody wants that texture.
- Greek yogurt: This adds tang, moisture, and boosts the protein without making things taste sour; plain is essential because flavored versions can overpower everything.
- Vanilla whey protein powder: Two scoops is the sweet spot that adds protein without making the filling taste chalky or gritty.
- Vanilla extract and lemon zest: These are the seasonings that make people ask what your secret ingredient is, so don't rush past them.
Tired of Takeout? 🥡
Get 10 meals you can make faster than delivery arrives. Seriously.
One email. No spam. Unsubscribe anytime.
Instructions
- Make the base:
- Combine oat flour, nut butter, honey, and salt in a bowl and mix until it looks like wet sand. You'll know it's ready when it holds together when squeezed but still has texture.
- Press into liners:
- Divide the mixture among six muffin liners and press down firmly with your fingers or the back of a spoon, making sure the layer is even. Don't be shy—a tight base prevents a mushy bottom later.
- Prepare the filling:
- Beat the softened cream cheese until smooth, then add the yogurt, protein powder, honey, vanilla, and lemon zest if using. Mix until completely creamy with no streaks of cream cheese visible.
- Layer and top:
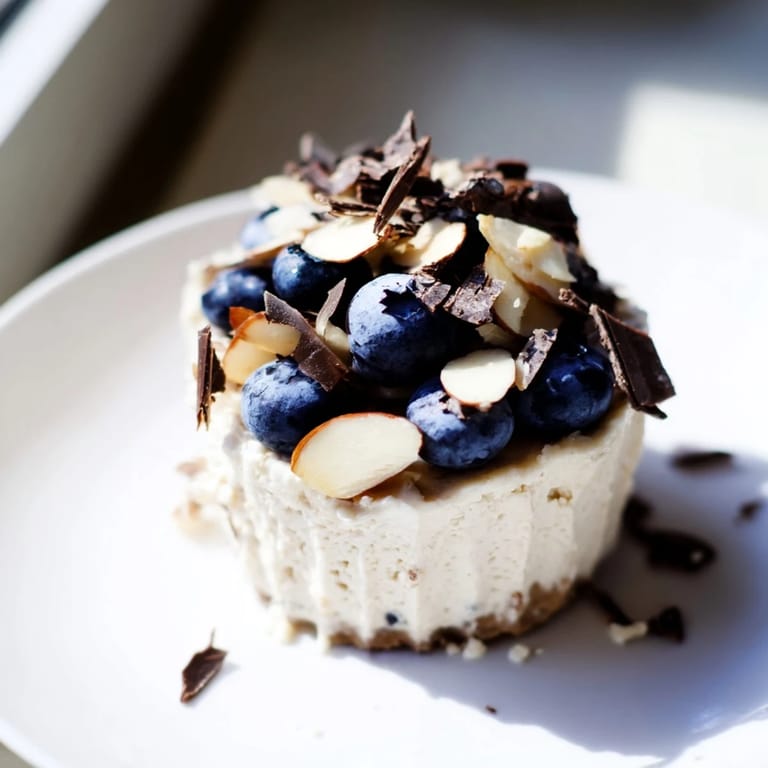
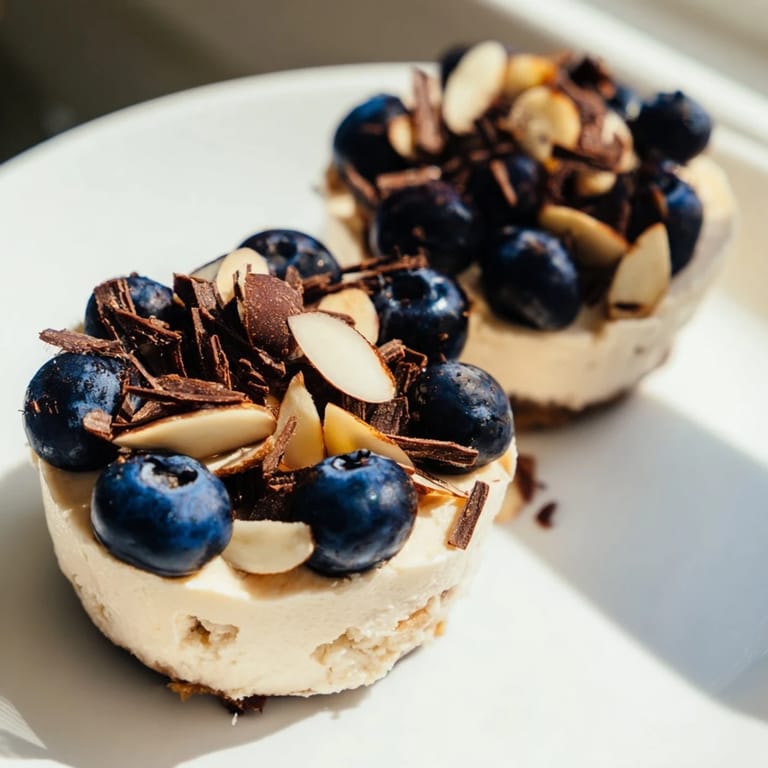
- Spoon the filling evenly over each base, smooth the tops, and add your chosen toppings—berries and nuts work magic here. The visual moment when you see your finished cups is worth savoring.
- Chill and set:
- Refrigerate for at least two hours until the filling is firm and holds its shape. They'll keep in the fridge for up to five days, which makes them perfect for meal prep.
 Pin it
  Pin it
 There was an evening when I made these for my mom while she was dealing with a hectic week, and watching her take a moment to actually sit down and enjoy something sweet felt like the best gift I could give. That's when I realized these cups are more than just a snack—they're permission to take care of yourself in a way that tastes good and makes you feel strong afterward.
Why the No-Bake Method Works
Baking cheesecake is beautiful but requires precision, temperature control, and honestly, more nerve than I have on a Tuesday. The no-bake approach trades all that anxiety for simplicity, and the result is just as creamy and satisfying. Greek yogurt and cream cheese already have the richness and tang you want, so there's zero reason to heat them and risk cracks or a gluey texture. What I love most is that you get feedback immediately—if the filling looks right when you make it, it will taste right when you eat it.
Customizing Your Cups
The beauty of these cups is that they adapt to whatever you have on hand and whatever you're craving that day. Some mornings I top mine with fresh raspberries and a drizzle of dark chocolate, other times it's crushed pistachios and a sprinkle of cocoa powder. If you're vegan or dairy-free, swap the cream cheese for the cashew-based kind, use coconut yogurt, and grab plant-based protein powder—the method stays exactly the same.
Storage and Make-Ahead Magic
These cups are honestly the ultimate make-ahead dessert because they live happily in the fridge for up to five days, which means you can prepare them on a calm Sunday and have yourself sorted for the entire week. I learned to assemble them in liners without removing them until just before serving, which keeps them from getting damaged and makes grabbing one for work so simple. The beauty is that they taste great straight from the fridge—cold and creamy and ready whenever you need something that satisfies the sweet craving while respecting your fitness goals.
- Always remove them from the muffin liners about 30 minutes before serving so they warm up just enough to taste their creamiest.
- If you forget to chill them overnight, they're still good but will be slightly softer, so handle them gently.
- Store any extras in an airtight container with parchment between layers so they don't stick together.
 Pin it
 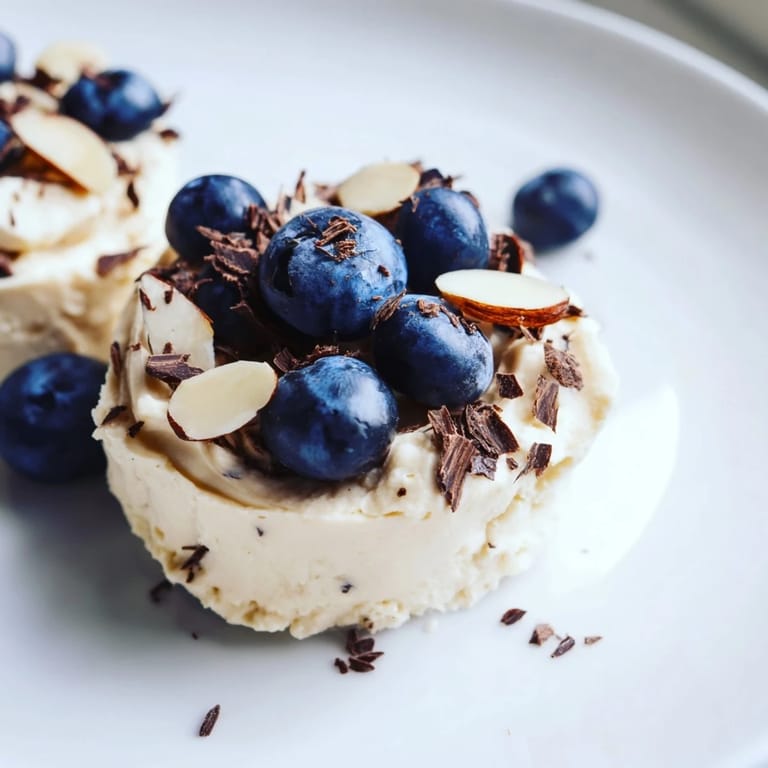 Pin it
 These cups remind me that eating well doesn't mean sacrificing the joy of dessert, and that's a lesson worth baking into every batch. Make them, share them, and watch people's faces when they realize something this good for you can actually taste like you're treating yourself.
Recipe FAQs
- → Can I make these gluten-free?
Yes, substitute oat flour with almond flour or use certified gluten-free oats to ensure a gluten-free base.
- → What protein powder works best?
Vanilla whey protein blends well, but plant-based protein powders can also be used for vegan options.
- → How long should I chill the cups?
Refrigerate for at least 2 hours to allow the filling to set and develop a creamy texture.
- → Can I add toppings?
Absolutely, fresh berries, chopped nuts, or dark chocolate shavings complement the creamy cups nicely.
- → Is this dessert suitable for post-workout snacks?
Yes, the high protein content and balanced ingredients make it a great option for replenishing energy after exercise.