 Pin it
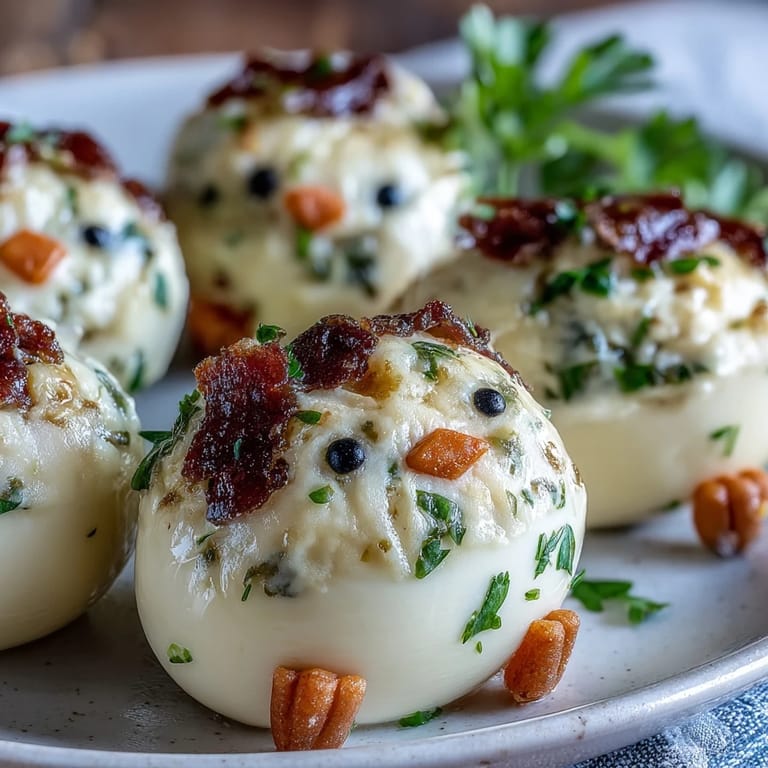
 These Deviled Egg Chicks are the most adorable way to serve a classic appetizer with a playful twist. Perfect for Easter brunch, spring gatherings, or any celebration where you want to bring smiles to the table, these little hatching chicks transform ordinary hard-boiled eggs into charming edible decorations. With their tiny carrot beaks, peppercorn eyes, and jaunty egg-white caps, they look almost too cute to eat—but one bite of that creamy, tangy filling will have everyone reaching for seconds.
Pin it The magic of this recipe lies in the simple presentation trick: slicing each egg horizontally to create a hatching chick effect. The creamy yolk filling is perfectly balanced with mayonnaise, mustard, and a hint of vinegar for tang, while the carrot decorations add a sweet crunch and vibrant color. Whether you're hosting an Easter egg hunt or simply want to brighten up your appetizer spread, these deviled egg chicks deliver both flavor and fun in every bite.
Ingredients
Tired of Takeout? 🥡
Get 10 meals you can make faster than delivery arrives. Seriously.
One email. No spam. Unsubscribe anytime.
- Eggs: 12 large eggs
- Filling: 3 tablespoons mayonnaise, 1 teaspoon yellow mustard, 1 teaspoon white vinegar, ¼ teaspoon salt, ⅛ teaspoon ground black pepper
- Decoration: 24 whole black peppercorns (for eyes), 1 medium carrot (for beaks and feet), optional: fresh chives or parsley for garnish
Instructions
- Step 1: Boil the Eggs
- Place eggs in a single layer in a large saucepan and cover with cold water. Bring to a boil over medium-high heat. Once boiling, cover, remove from heat, and let stand for 10 minutes.
- Step 2: Cool the Eggs
- Transfer eggs to a bowl of ice water and let cool completely, about 5 minutes.
- Step 3: Peel and Dry
- Gently peel the eggs and pat dry.
- Step 4: Create the Chick Shape
- For each egg, slice a small portion off the bottom so the egg stands upright. Slice off the top ⅓ of the egg (horizontally) to create a cap.
- Step 5: Remove the Yolks
- Carefully remove yolks and transfer to a bowl. Place egg whites on a serving tray.
- Step 6: Make the Filling
- Mash yolks with mayonnaise, mustard, vinegar, salt, and pepper until smooth and creamy.
- Step 7: Fill the Egg Whites
- Using a spoon or piping bag, fill the bottom egg whites with the yolk mixture, mounding it slightly to form the chick's head.
- Step 8: Add the Caps
- Place the egg white caps back on at a jaunty angle to resemble a chick hatching.
- Step 9: Create Beaks and Feet
- Cut tiny triangles from the carrot for beaks, and small slivers for feet. Gently press the beaks and feet into the yolk mixture.
- Step 10: Add the Eyes
- Add two black peppercorns for eyes on each chick.
- Step 11: Garnish and Serve
- Garnish with fresh chives or parsley if desired. Serve chilled.
Zusatztipps für die Zubereitung
For perfectly cooked hard-boiled eggs with no green ring around the yolk, timing is key. The 10-minute covered rest after boiling gives you tender yolks that are fully set but still creamy. Make sure to use eggs that are at least a week old—they peel much easier than fresh eggs. When slicing the eggs, use a sharp knife wiped clean between cuts for neat edges. If the yolk mixture seems too thick, add a tiny bit more mayonnaise or a splash of milk to achieve the perfect pipeable consistency.
Varianten und Anpassungen
This recipe is wonderfully adaptable to different tastes and dietary needs. For a lighter version, swap the mayonnaise for Greek yogurt, which adds protein and a subtle tang. If you want to add more flavor to the filling, try mixing in a pinch of paprika, chopped fresh dill, or finely minced chives. For softer eyes that are easier to eat, use small pieces of black olives instead of peppercorns. You can even make these ahead of time—prepare the chicks up to 1 day in advance, cover tightly, and refrigerate until ready to serve.
Serviervorschläge
Serve these adorable chicks on a bed of fresh greens or shredded lettuce to create a nest effect. Arrange them on a large platter surrounded by fresh vegetables like cherry tomatoes, cucumber slices, and carrot sticks for a colorful Easter spread. They're perfect alongside other spring appetizers like asparagus bundles, cheese platters, or fresh fruit. For an extra festive touch, scatter some edible flowers or fresh herbs around the serving tray. These chicks also make wonderful additions to brunch buffets, picnic baskets, or kids' party tables.
 Pin it
 These Deviled Egg Chicks prove that a little creativity can transform a simple classic into something truly special. Whether you're celebrating Easter, hosting a spring baby shower, or just want to make ordinary snack time extraordinary, these cheerful little chicks bring joy to every occasion. Kids and adults alike will be delighted by their charm, and you'll love how easy they are to make. So gather your eggs, sharpen your knife, and get ready to create an appetizer that's as fun to make as it is to eat!
Recipe FAQs
- → How do I prevent eggs from cracking during boiling?
Place eggs in a single layer in cold water and bring to a gentle boil. Once boiling, remove from heat and let stand covered to finish cooking evenly and reduce cracking.
- → Can I substitute mayonnaise in the filling?
Yes, Greek yogurt works well as a lighter alternative while maintaining creamy texture and tangy flavor.
- → What can I use instead of black peppercorns for eyes?
Small pieces of black olives make a softer option while still providing contrast for the eyes.
- → How long can these deviled egg chicks be stored?
They can be prepared ahead and refrigerated, covered, for up to one day to maintain freshness.
- → Any tips for decorating the chicks?
Use thinly sliced carrots for tiny beaks and feet, and fresh chives or parsley for garnish to enhance presentation.