 Pin it
 I discovered the magic of pickled vegetables on a rainy afternoon in a small farmer's market, where an elderly vendor's grandmother's recipe changed everything. The woman handed me a jar of vibrant, glistening vegetables and told me it was the secret to feeding a crowd without stress. That single jar sparked a love affair with the art of preserving vegetables at home, and now I find myself making batches whenever I want to impress guests or simply add color and tang to an ordinary meal.
I'll never forget the moment I served this to my sister's book club when I was running behind schedule. I'd prepared the vegetables the night before, and on serving day, I simply arranged them on a beautiful board in those perfect little jars. Everyone gathered around it like it was edible jewelry, and I watched people come back for handful after handful. That's when I realized this wasn't just food, it was an experience.
Ingredients
- Carrots, julienned: The sweetness of carrots balances the vinegar beautifully, and cutting them into thin matchsticks means they pickle evenly and stay perfectly tender
- Cucumber, sliced: Choose firm cucumbers or they'll turn mushy; thin slices absorb the brine faster and stay crisp
- Radishes, thinly sliced: These add a peppery bite and stay wonderfully crisp even after days of pickling
- Red cabbage, shredded: The color deepens and becomes even more jewel-like as it sits in the brine, making this almost too pretty to eat
- Cauliflower florets: Small florets are key here; they need room for the brine to reach every part
- Green beans, trimmed: Fresh green beans add textural contrast and stay snappy even after fermentation
- White vinegar: The backbone of your brine; it's mild enough not to overpower, but sharp enough to make vegetables sing
- Water: Dilutes the vinegar to the perfect level of tang
- Sugar: A touch of sweetness rounds out the flavor profile and helps preserve everything
- Kosher salt: Use kosher, not table salt, because the crystals dissolve more evenly and the flavor is cleaner
- Garlic cloves, sliced: Becomes mellow and sweet as it pickles alongside the vegetables
- Mustard seeds: These tiny bursts of flavor add complexity and a subtle warmth
- Coriander seeds: A fragrant spice that brings earthiness to the tart profile
- Black peppercorns: Whole peppercorns release flavor slowly, so you get a building warmth rather than a sharp bite
- Bay leaves: The quiet flavor that ties everything together
- Fresh dill: Adds an herbaceous, almost dill-pickle quality that feels homemade and intentional
- Red chili, sliced: Optional, but even a small one adds warmth that builds with each bite
Tired of Takeout? 🥡
Get 10 meals you can make faster than delivery arrives. Seriously.
One email. No spam. Unsubscribe anytime.
Instructions
- Prepare Your Canvas:
- Wash all your vegetables thoroughly and pat them completely dry. Julienne your carrots into thin matchsticks, slice cucumbers and radishes thin enough to see light through them, shred your red cabbage into fine ribbons, and cut cauliflower into small, even florets. Trim your green beans and lay everything out so you can see the rainbow of colors you're about to pickle.
- Make the Brine:
- Pour your vinegar and water into a saucepan and place it over medium heat. Add the sugar and salt, stirring constantly until both dissolve completely. You'll notice the liquid becomes completely clear and hot. Remove it from the heat and let it cool for just a few minutes until it's warm but not piping hot.
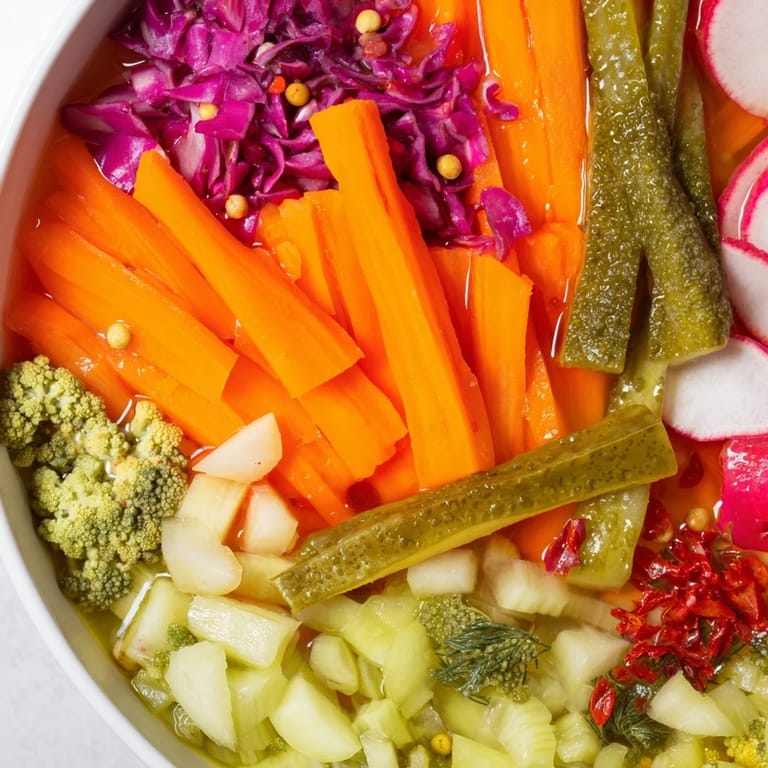
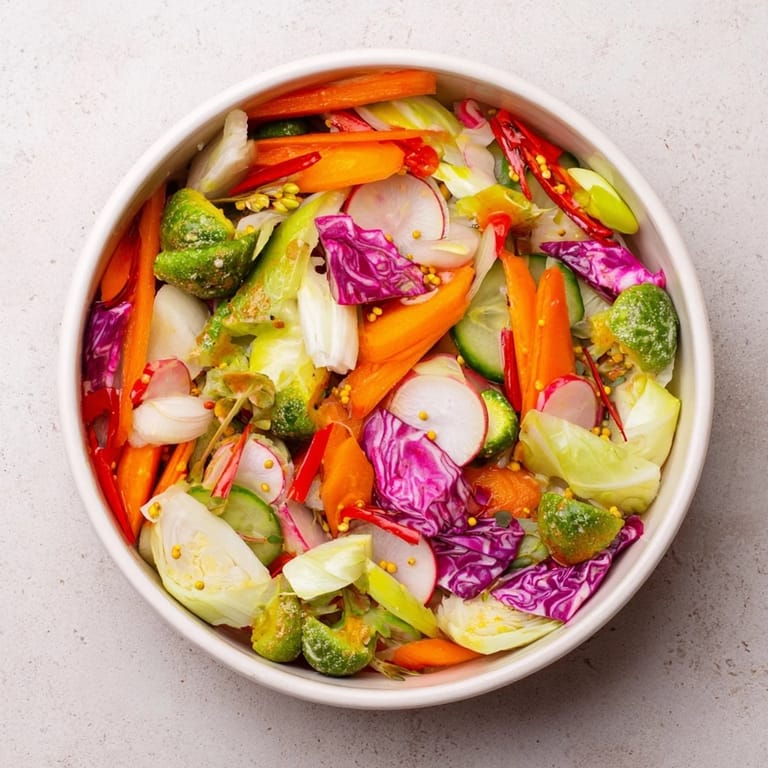
- Pack with Purpose:
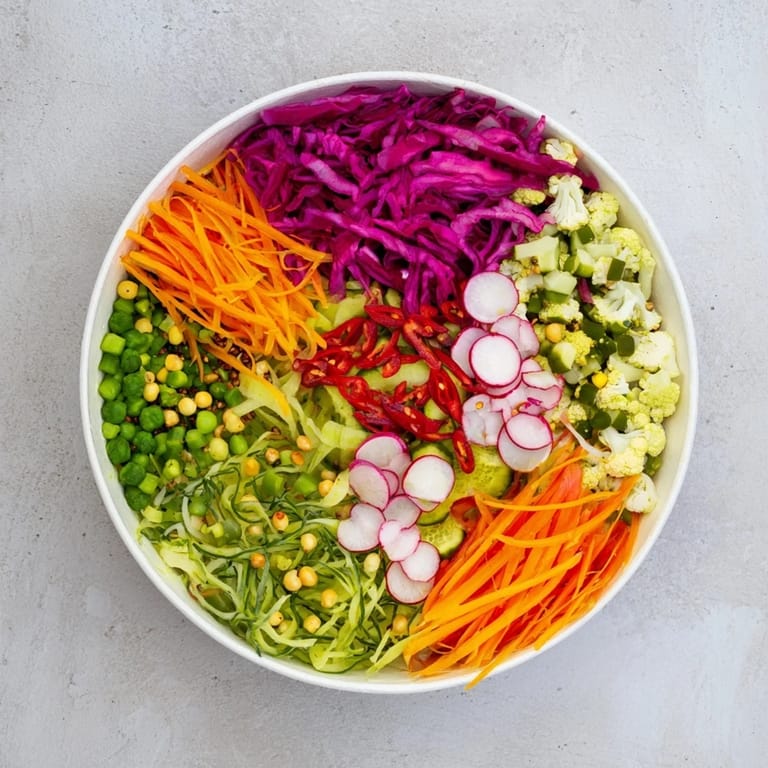
- Get your clean glass jars ready, and begin layering your vegetables strategically. Keep similar colors grouped together or arrange them in a pattern you love. The tighter you pack them, the better they pickle and the more stunning they look in the jar. This is where your platter comes to life.
- Season the Jars:
- Distribute your garlic slices, mustard seeds, coriander seeds, peppercorns, bay leaves, dill sprigs, and chili slices evenly among your jars. These aromatics will slowly infuse into every vegetable, creating layers of flavor that deepen over time.
- Pour and Submerge:
- Carefully pour your warm brine over the vegetables until everything is completely covered. It's crucial that no vegetables peek above the brine line, or they'll oxidize and lose both flavor and color. Top up if needed.
- Cool and Chill:
- Put the lids on your jars and let them sit on the counter at room temperature until they cool completely, which takes about an hour. Then move them to the refrigerator. This is where the magic happens, and patience is essential.
- Wait the Right Amount:
- For quick pickles with fresh crunch, 12 hours is enough. But if you can wait 48 hours, the flavors develop into something deeper and more complex, and the vegetables become more tender. This is your choice, but I promise it's worth the wait.
- Arrange for Glory:
- When you're ready to serve, arrange your jars on a beautiful board or platter. The visual presentation is half the magic here. Let people see those jewel-like colors and reach for jars rather than plating everything.
 Pin it
 There's something about offering a guest a jar of homemade pickled vegetables that changes the entire energy of sharing food. It says, I thought about you. I made this with my hands. It's not just sustenance, it's care in a jar.
The Art of Arrangement
The visual presentation of this pickled feast is just as important as the flavor. I've learned that arranging vegetables by color or in geometric patterns transforms what could be a simple condiment into a centerpiece. Line them up in rows, create concentric circles, or fill jars with deliberate gradations of shade. Your eyes will taste the food before your mouth does, and that anticipation makes the flavors taste even brighter.
Flavor Variations Worth Exploring
Once you master the basic quick pickle, the variations become endless. I've experimented with rice vinegar for a lighter, more delicate tang, apple cider vinegar for earthiness and warmth, and even white balsamic for something rich and complex. Fresh herbs change everything too, whether it's cilantro for a brighter edge, thyme for something more savory, or a strip of orange zest for unexpected citrus notes. Each variation tells a different story.
Serving and Pairing Wisdom
I've learned that pickled vegetables are most magical when served as part of a larger experience. Arrange them alongside cured meats and crusty bread for a charcuterie moment, pair them with vegan cheeses and crackers for something plant-forward and elegant, or even serve them as a palate cleanser between courses. If you're pouring wine, a crisp Riesling or dry rosé will echo the tartness and make everything taste more refined.
- Seasonal vegetables like beets, turnips, and pearl onions transform the platter with each season
- Double-check store-bought kimchi or sauerkraut for hidden fish sauce or gluten if dietary restrictions matter
- Make these at least a day ahead so you're never stressed when guests arrive
 Pin it
 This pickled and fermented feast reminds me that sometimes the most impressive dishes are simply vegetables and vinegar transformed by a little patience and intention. Serve it with pride.
Recipe FAQs
- → What types of vegetables work best for pickling and fermenting?
Crunchy vegetables like carrots, cucumbers, radishes, cabbage, cauliflower, and green beans hold up well and develop great texture and flavor.
- → How long should I ferment the vegetables for optimal flavor?
For quick pickling, refrigerate at least 12 hours; fermentation at room temperature typically takes 5–7 days for deeper, tangy flavors.
- → Can I customize the brine for different tastes?
Yes, variations like rice vinegar or apple cider vinegar, along with fresh herbs or citrus zest, can add unique aromas and flavors.
- → How should I store pickled and fermented vegetables?
Keep jars sealed in the refrigerator after pickling, or at room temperature during fermentation, then refrigerate when desired taste is reached.
- → What dishes pair well with this vegetable platter?
This platter complements crusty bread, cured meats, vegan cheeses, and pairs nicely with crisp Riesling or dry rosé wines.