 Pin it
 My daughter spotted a picture of an Easter bunny cake in a magazine and wouldn't stop talking about it for weeks. When Easter finally rolled around, I found myself standing in my kitchen at 6 AM, wondering if I could actually pull off this whimsical creation. The vanilla cake layers came together easily enough, and as the coconut frosting took shape, I realized this wasn't just another dessert—it was going to be the centerpiece of our spring celebration. Watching her eyes light up when she saw the bunny ears emerge from the carefully cut cake pieces made every flour-dusted moment worth it.
I'll never forget my neighbor peering over the fence and asking what bakery I'd ordered from, then looking genuinely shocked when I said I'd made it myself. That moment of unexpected pride stayed with me all day, and suddenly the mess of coconut all over my counters felt like the price of admission to a pretty special afternoon.
Ingredients
- All-purpose flour: Two and a half cups gives you the structure to hold this cake together without making it dense, and I've learned that scooping and leveling rather than sifting saves time while still keeping things light.
- Baking powder: Two and a half teaspoons is the right amount to give the cake that tender crumb, though in high altitude kitchens you might find you need slightly less.
- Unsalted butter: A full cup for the cake and another for the frosting—the softness matters here, so pull it out of the fridge at least an hour before you start mixing.
- Granulated sugar: Two cups sweetens the cake while the creaming method with butter incorporates air that makes it rise beautifully.
- Eggs: Four large eggs, added one at a time, keeps the batter emulsified and prevents the curdled look that happens when you rush this step.
- Whole milk: One cup creates moisture and a tender crumb, though I've substituted buttermilk in a pinch for a slightly tangy depth.
- Powdered sugar: Four cups sifted prevents lumps in the frosting and gives you that cloud-like texture that makes people ask for your secret.
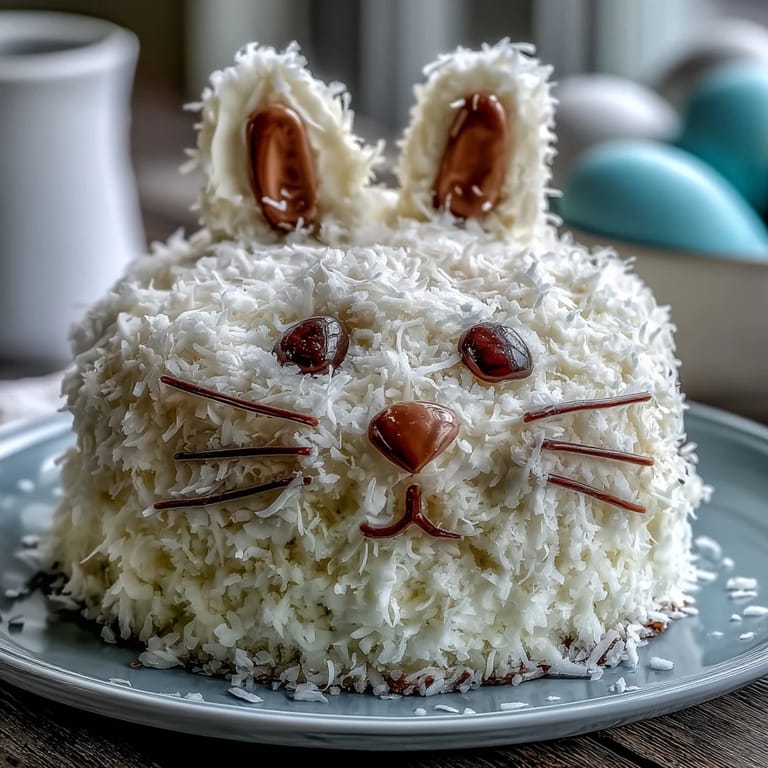
- Sweetened shredded coconut: Two cups pressed into the frosting creates that signature fluffy bunny appearance, and toasting it first deepens the flavor if you want something richer.
- Food coloring: Pink tint for the inner ears and nose brings the bunny face to life with just a drop or two.
- Jelly beans or candy-coated chocolate eggs: These become the eyes and add a festive spring touch that feels intentional rather than random.
- Licorice strings: Thin licorice whips curl beautifully into whiskers and give the bunny personality without needing artistic skill.
- Mini marshmallows: They stick to the frosting easily for cheeks and a fluffy tail, and they taste like nostalgia.
Tired of Takeout? 🥡
Get 10 meals you can make faster than delivery arrives. Seriously.
One email. No spam. Unsubscribe anytime.
Instructions
- Set up your pans and heat your oven:
- Preheat to 350°F and grease and flour two 9-inch round pans thoroughly—I like to use a mix of butter and flour rather than spray, which gives me more control over the release. Getting the oven temperature right is non-negotiable here, so use an oven thermometer if you're not sure yours reads true.
- Combine your dry ingredients:
- Whisk together the flour, baking powder, and salt in a bowl—this distributes the leavening evenly and prevents pockets of bitterness from concentrated baking powder. Set it aside and don't skip this step even though it seems simple.
- Cream butter and sugar until clouds form:
- Cream butter and sugar:
- Beat softened butter and sugar for about three minutes until it's pale and fluffy—you're incorporating air that will make the cake light. Stop and scrape the bowl halfway through so everything creams evenly.
- Add eggs one at a time:
- Drop each egg in individually and beat well after each addition before adding the next one—this takes a bit longer but keeps the batter smooth and homogeneous. Add the vanilla after the last egg goes in.
- Alternate wet and dry mixtures:
- Start with flour, then milk, then flour again, ending with flour—this order prevents the batter from becoming grainy or overmixed. Mix just until you don't see streaks of flour anymore, then stop.
- Divide and bake:
- Pour batter evenly between pans and bake for 30 to 35 minutes, testing with a toothpick near the center—it should come out clean or with just a crumb or two. The kitchen will smell incredible when they're almost done.
- Cool with patience:
- Let cakes rest in their pans for 10 minutes—this prevents them from sticking—then turn them out onto wire racks to cool completely. Trying to frost a warm cake is a recipe for disaster, so make coffee and wait.
- Make the frosting while cakes rest:
- Beat softened butter until creamy, then gradually add powdered sugar in batches along with milk and vanilla until fluffy. This takes about five minutes of beating and the results are worth the arm workout.
- Reserve pink frosting for the bunny features:
- Scoop out half a cup of white frosting into a separate bowl and tint it pink with a few drops of food coloring—stir gently so the color is even. This will be your inner ears and nose later.
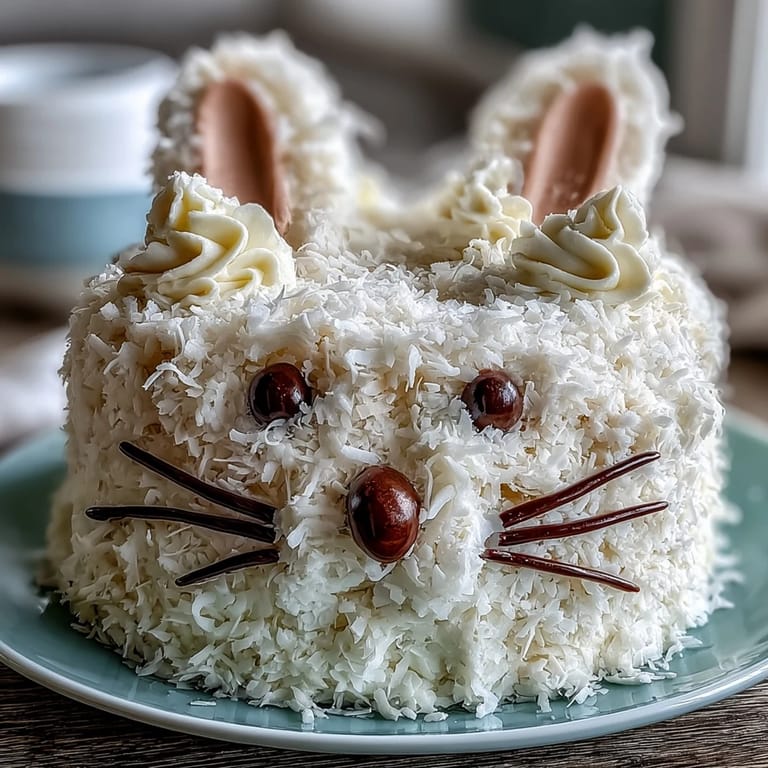
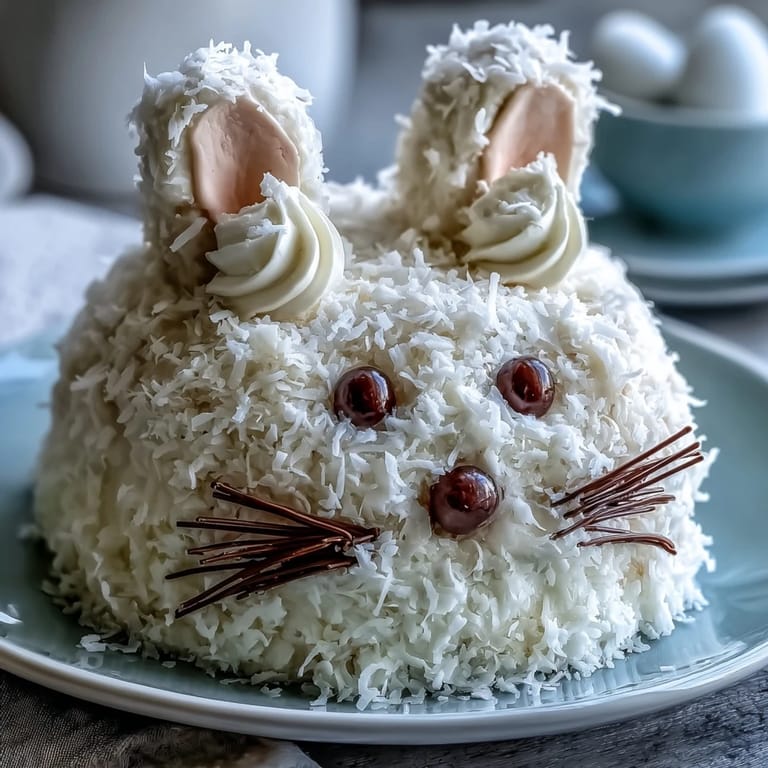
- Cut one cake into bunny ears and bow tie:
- Use a serrated knife to cut the second cake into two ear shapes and a small bow tie—there are templates online but honestly, the bunny is forgiving and a little wonkiness adds charm. Keep your knife damp to prevent crumbs from sticking.
- Arrange your bunny on a large board:
- Place one whole round cake as the face, position the two ear shapes above it, and set the bow tie below—step back and look at it from a distance to make sure it reads as a bunny. A large platter or cutting board works perfectly.
- Apply a crumb coat first:
- Spread a thin layer of white frosting over the entire assembled cake to seal in crumbs, then refrigerate for 15 minutes—this extra step makes the final frosting look polished. It's a baker's secret that makes a visible difference.
- Frost generously and add coconut:
- Spread remaining white frosting thickly over everything, then immediately press shredded coconut all over the surface while the frosting is still sticky—work in sections so it doesn't dry out. The coconut adheres beautifully and creates that fluffy bunny texture.
- Add the pink details:
- Fill in the inner ears and nose area with pink frosting using an offset spatula or the back of a spoon. The contrast between white and pink makes the bunny face pop.
- Decorate the face with personality:
- Place jelly beans or candies for eyes, chocolate chips or edible gel for a nose, licorice strings arranged as whiskers, and mini marshmallows for cheeks and a fluffy tail. Take your time with this part—it's where the bunny comes alive.
 Pin it
 There's something magical about presenting a cake that looks like it took professional skills but came from your own hands and kitchen. When my daughter insisted on showing every neighbor and friend before we even cut into it, I realized this cake was never really about the recipe—it was about creating a moment she'd remember.
Timing and Planning Your Bake
I've found that starting this cake the day before a gathering takes pressure off the morning of. The cake layers can be wrapped tightly and stored overnight, which actually gives the crumb time to set and become even more tender. The frosting is best made fresh, but if you're organized, you can whip it together while the cakes are cooling—the whole process feels manageable when you break it into chunks rather than trying to do everything at once.
Flavor Variations That Still Work
While the vanilla and coconut combination is wonderful as written, I've experimented with substitutions that all turned out beautifully. Toasting the coconut in a dry skillet for a few minutes before pressing it onto the frosting brings out a deeper, almost caramel-like flavor that elevates the whole cake. If your crowd prefers tangier flavors, swapping the vanilla frosting for cream cheese frosting transforms this into something that feels more sophisticated without losing the playful bunny shape.
Serving and Celebrating
This cake looks stunning on a cake stand or large platter, and it's sturdy enough to travel to potlucks or Easter gatherings without falling apart during transport. The coconut coating actually protects the frosting from smudging, which is one of those happy accidents of design.
- Pair it with light Moscato or fresh lemonade for a spring celebration that feels intentional and festive.
- Slice carefully with a serrated knife dipped in warm water between cuts to keep the frosting clean.
- Leftover cake keeps covered at room temperature for two days or refrigerated for up to four days, though it rarely lasts that long.
 Pin it
 This cake proves that impressive desserts don't require professional pastry training—just a willingness to have fun with food and maybe a little creative chaos along the way. Your Easter table will be unforgettable.
Recipe FAQs
- → How is the bunny shape achieved?
The cake is assembled by cutting one layer into ear shapes and arranging them on top of a round base, with a bow tie shape at the bottom for detail.
- → What ingredients contribute to the frosting’s texture?
Butter and powdered sugar whipped together with milk and vanilla create a smooth, fluffy coconut frosting topped with shredded coconut for extra texture.
- → Can the layers be prepared in advance?
Yes, the cake layers can be baked and stored tightly wrapped a day ahead to save time during assembly.
- → Are there decoration alternatives?
Yes, sweets like jelly beans, licorice strings, and mini marshmallows are used, but you can customize with similar candies or edible gels for facial features.
- → What are some suggested beverage pairings?
Light Moscato or refreshing lemonade complement the cake’s sweet and creamy flavors well during spring celebrations.
- → Is the frosting adaptable for other flavors?
Sure, swapping shredded coconut for toasted coconut or using cream cheese frosting offers flavorful twists.