 Pin it
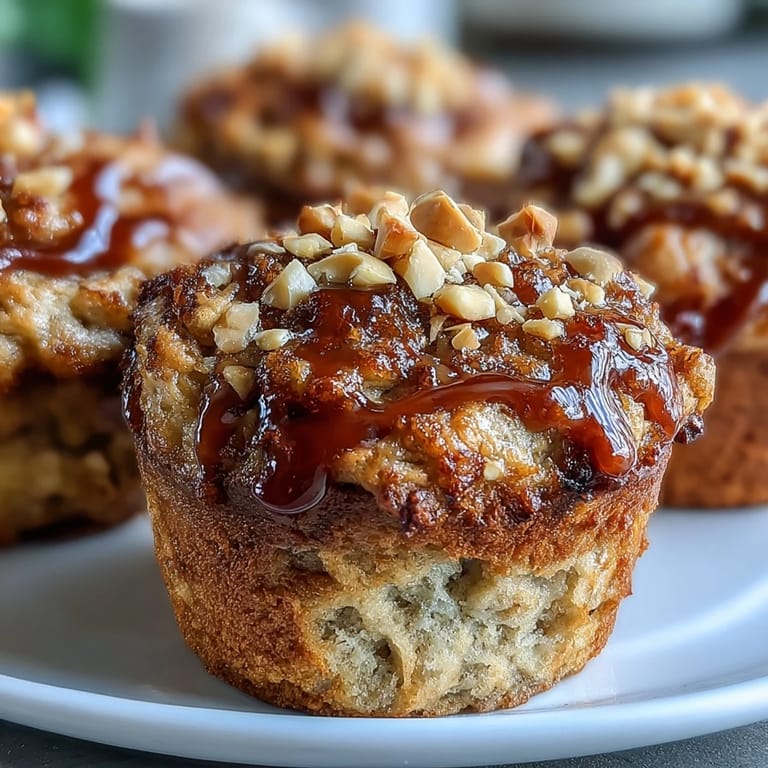
 My neighbor handed me a warm guava pastry one afternoon, and I bit into it expecting something fancy—instead found myself transported to childhood PB&J nostalgia mixed with something entirely new. That moment sparked an obsession with combining those flavors into something I could bake at home, and these muffins became my answer. They're the kind of thing that makes your kitchen smell like a bakery, and somehow always disappear faster than you'd expect.
I baked these for my book club on a rainy Thursday, and three people asked for the recipe before they'd even finished the first one. What stuck with me wasn't just their approval—it was watching someone's face light up when they hit that guava center, like they'd discovered something they didn't know they needed.
Ingredients
- All-purpose flour (2 cups): The foundation that keeps these muffins tender rather than dense, and sifting it with the leavening agents prevents lumps that can ruin the crumb.
- Creamy peanut butter (1/2 cup): Use the kind without added sugar if you can—it lets the guava flavor shine without competing sweetness.
- Unsalted butter (1/2 cup, melted): Melting it first creates a richer, more integrated crumb than cold butter ever could.
- Granulated sugar (1 cup): This balances the peanut butter's earthiness and helps the muffins brown beautifully on top.
- Eggs (2 large): They bind everything together and add moisture that makes these feel bakery-quality instead of homemade-dry.
- Whole milk (1 cup): The fat content keeps the batter smooth and the final muffins from becoming crumbly.
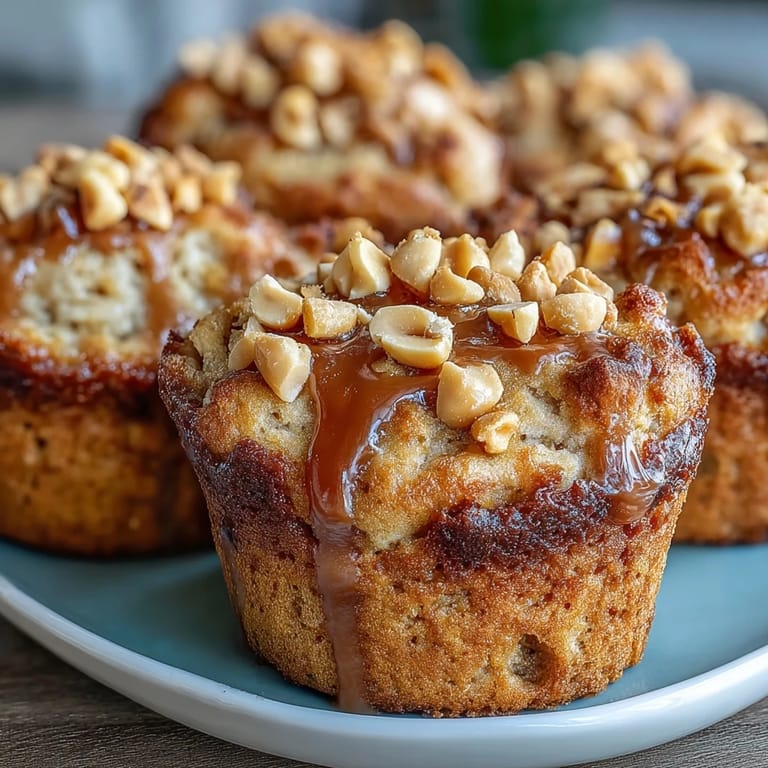
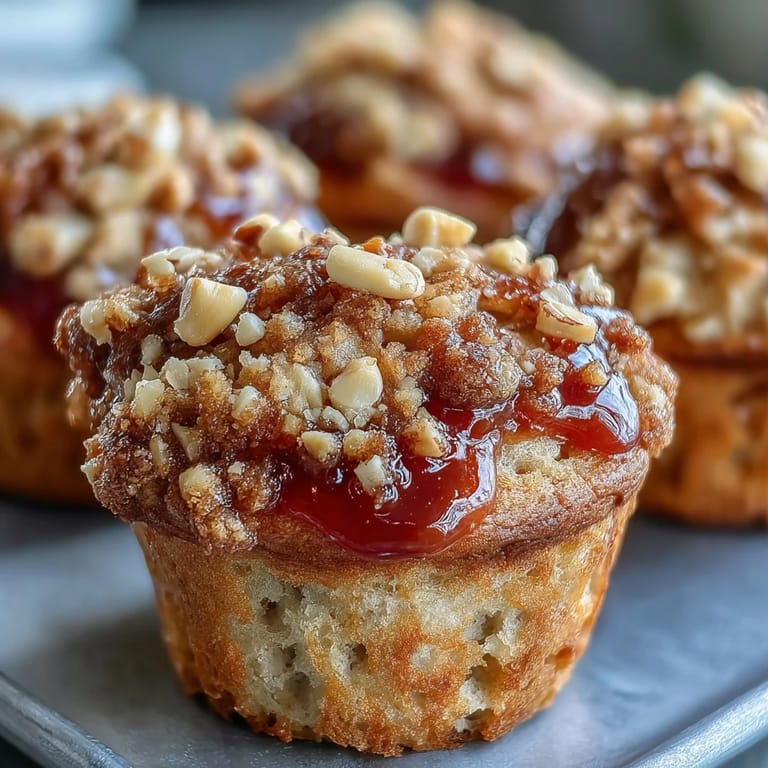
- Guava preserves (2/3 cup): This is where the magic happens—look for a brand with actual fruit, not just sugar, or the flavor gets lost.
- Baking powder and baking soda (1 tsp and 1/2 tsp): Together they create lift without making the muffins taste metallic or bitter.
- Roasted peanuts (1/4 cup, chopped): The optional topping adds texture and doubles down on the peanut flavor if you're craving it.
Tired of Takeout? 🥡
Get 10 meals you can make faster than delivery arrives. Seriously.
One email. No spam. Unsubscribe anytime.
Instructions
- Get your oven ready:
- Preheat to 350°F and line your muffin tin—this prevents sticking and makes cleanup almost too easy. Cold tins sometimes make the bottoms bake faster than the tops, so this small step matters more than it sounds.
- Mix the dry team:
- Whisk flour, baking powder, baking soda, and salt in a bowl until they're evenly distributed. You're creating a uniform base that'll rise predictably throughout baking.
- Cream the peanut butter mixture:
- Beat peanut butter, melted butter, and sugar until smooth—this usually takes about two minutes and you'll notice it go from grainy to glossy. The mixture should look almost like frosting at this point.
- Add the eggs one at a time:
- Crack each egg directly into the bowl and mix thoroughly before adding the next one, letting each fully incorporate. This prevents that weird eggy texture that happens when you rush.
- Stir in the milk and vanilla:
- Add these slowly, mixing gently until the wet ingredients look cohesive. If you're overthinking it, you're probably on the right track.
- Fold wet and dry together:
- This is the critical moment—use a spatula and fold gently, stopping the second you don't see dry flour anymore. Overmixing creates tough, dense muffins, so resist the urge to keep stirring.
- Fill the muffin cups strategically:
- Put batter halfway up each cup, then add about a teaspoon of guava preserves to the center of each—this creates that surprise pocket. Cover with the remaining batter so the preserves don't escape during baking.
- Top with peanuts if you're feeling fancy:
- Sprinkle the chopped roasted peanuts over each muffin before baking for a little crunch and visual appeal. This step is optional but absolutely worth it if you have them on hand.
- Bake until barely golden:
- Look for about 20 to 22 minutes—the key is inserting your toothpick into the side, not the center, since the guava filling will always look wet. When they're done, the edges should be lightly browned and a toothpick in the actual muffin portion comes out clean.
- Cool with patience:
- Let them sit in the pan for five minutes so they firm up enough to handle, then move them to a wire rack. They'll continue cooking slightly from residual heat, which is exactly what you want.
 Pin it
 These muffins felt like proof that you don't need exotic ingredients or complicated techniques to create something memorable. They became the thing my kids requested for their school lunches, the thing I grabbed when someone dropped by unexpectedly, and somehow the thing that made our house smell like a real bakery on weekend mornings.
Storage and Keeping
Room temperature works fine for about two days if you keep them in an airtight container, though they're honestly better on day one when they're still slightly warm. The freezer is where they truly shine—wrapped individually and frozen for up to two months, they thaw beautifully either overnight in the fridge or in about thirty minutes at room temperature. I've learned that thawed muffins taste almost as good as fresh ones, which makes these a perfect make-ahead option.
Why Guava Works Here
Guava has this bright, almost tart quality that cuts through peanut butter's richness in a way strawberry jam never quite does. It's not overly sweet on its own, so it doesn't turn these muffins into cake masquerading as breakfast. Once you taste that combination, other flavor pairings start to feel a little safe and predictable.
The Small Details That Matter
Temperature matters more than people admit—melting the butter first means it mixes seamlessly with the peanut butter instead of creating little solid pockets. Using whole milk instead of skim or buttermilk changes the entire crumb structure, making them tender instead of tough. These aren't fancy tricks, just observations from batches that didn't quite work until I paid attention to the things that seemed small.
- Let the batter rest for exactly two minutes before filling the cups—it relaxes the gluten just enough to create a tender crumb without becoming deflated.
- If your guava preserves are particularly chunky, mash them slightly before filling so they distribute more evenly inside each muffin.
- Room temperature ingredients mix together more smoothly than cold ones, so let your eggs and milk sit out for fifteen minutes before you start baking.
 Pin it
 Baking these has taught me that sometimes the best recipes come from wanting to recreate a feeling rather than following a trend. These muffins do exactly that—they turn childhood simplicity into something grown-up and bakery-worthy.
Recipe FAQs
- → Can I use different fruit preserves?
Yes, strawberry or raspberry jam work beautifully as substitutes for guava preserves. These alternatives create a classic PB&J flavor profile that everyone recognizes and loves.
- → How should I store these muffins?
Store in an airtight container at room temperature for up to 3 days. For longer storage, freeze individually wrapped muffins for up to 2 months. Thaw at room temperature before serving.
- → Why check the edge instead of center for doneness?
The center contains guava preserves which remains gooey even when fully baked. Testing the edge ensures the batter itself is cooked through without getting a false reading from the fruit filling.
- → Can I make these gluten-free?
Substitute the all-purpose flour with a 1-to-1 gluten-free flour blend. Ensure your baking powder and other ingredients are certified gluten-free. The texture may vary slightly.
- → What's the best way to fill the muffins with preserves?
Fill each cup halfway with batter, then add one generous teaspoon of guava preserves directly to the center. Cover with remaining batter, ensuring the preserves are completely enclosed.
- → Can I use natural peanut butter?
Natural peanut butter works, but the results may be slightly denser. Creamy commercial peanut butter provides the best texture and consistency for these moist, tender muffins.